First of all, I feel like I have to justify myself as to the reason I went down this rabbit hole. All began in Nuke (as always), when I started to have a Saturation node giving me some unexpected result. Truth is, we’ve all been in, or witnessed this situation :

This article comes from an analogous situation, the nerd equivalent of what we could consider a trap.
This project started as a willingness to learn a bit more about colorspaces, and how color is encoded in our images, exr files in this case, used by the whole VFX industry. Colorspaces are these amazing concepts implemented everywhere in our pipeline, for which everyone has a specific, more or less precise, idea of how these works and how they should be handled. Everyone is pretty confident in their own knowledge; until a problem comes for which no one has a solution. That’s the moment you realize you really have no idea how these are working, you start digging an endless suite of universes without knowing where you’re going, and you end up saying « Huum, we’ll just use Aces, this looks to work fine« . And it does ! Aces is obviously not perfect, and the people doing it have no pretension saying Aces is the perfect solution for everything, but it’s a solution made by people who know more about colorspaces than most of us. I wanted to get a grasp of the knowledge these people have, so I started studying colorspaces. Today I can say I am really far from being an expert, but studying these is such an enriching journey that I can only recommend you do the same.
The thing is, believe it or not, this article is not about colorspaces; these came to the conversation for the only reason that I had the idea of this optimisation/other-way-of-encoding-pixels while reading OpenColorIO’s source code. A lot could be written about OCIO as, in my opinion, it is really a masterpiece of science and engineering, I had no idea how much was going behind the scene of Nuke’s color/picture processing. And actually, Nuke is a good starting point to explain picture encoding, as it is famous for it’s full 32 bit float encoding.
16bit half; 32bit float; What do these mean ?
Floating point data doesn’t just exist in the digital picture world, it actually applies to the whole computer industry; that’s why the way of encoding floating point numbers (number with decimals) is strictly standardized; this standard has the sweet name of IEEE 754. Here’s a quick summary, written in my own words, of how this works:
A number is basically separated in three parts.
- The sign : is this number positive or negative
- The exponent : the number 2 will be powered by this value
- The mantissa : the previously obtained number will be multiplied by 1.<mantissa’s value>; the mantissa is basically creating steps between two 2x numbers.
In 32 bit encoding, the sign is 1 bit, the exponent in 8 bit (1 byte), and the mantissa is 23 bit.
In 16 bit encoding, the sign is 1 bit, the exponent in 5 bit, and the mantissa is 10 bit.
Every bit represents a power of two, for a 32bit float number the exponent becomes:
28 + 27 + 26 + 25 + 24 + 23 + 22 + 21 – Hence the maximum value is 255. This, being a power of two, can represent a really huge number (≈1076), way bigger than what we’d need, and currently we can’t really create very small number, like a very dark pixel in our picture. So what was decided is to subtract by default a value of this exponent, named bias, which is usually half of the maximum exponent available. In the case of 32 bit, the bias is 127, we can then represent numbers between 2-127 and 2128. In reality exponent -127 and 128 are reserved and the actual used range is between 2-126 and 2127 which is still a nice range to encode our pixels.
Mantissa works in an analogous way, each bit is a power of two, negative in this case.
2-1 + 2-2 + 2-3 + 2-4 + 2-5 + … + 2-22 + 2-23
To which we add 1, and then multiply with our exponent. This gives us our final number. There’s always a catch, so obviously there are particular cases. You may have noticed that we can’t really represent 0 with this method, so there is a specific procedure called denormalisation in the case where the exponent reaches -127, in which case the exponent goes up to -126, and 1 is not added to the mantissa anymore, hence becoming 0.<mantissa>*exponent, so if mantissa is 0, our number ends up being 0.
What about infinity and NaNs? Well, this is the reason why we can’t express exponent above 2127, exponent of 128 (all bits being set to one) can mean two values (you’ve guessed) : infinity or NaN (Not a number). How do we differentiate ? If all mantissa’s bits are 0, our number is infinity, else if any mantissa’s bit is one, our number is, well, not a number. You can see that there are a lot of values reserved for NaNs, I’m not sure why so much place is used, one hypothesis I read is that this can be used to store data as to why the number became a NaN (assuming it’s calculation error).
This is how every single channel of every layer we use are encoded.
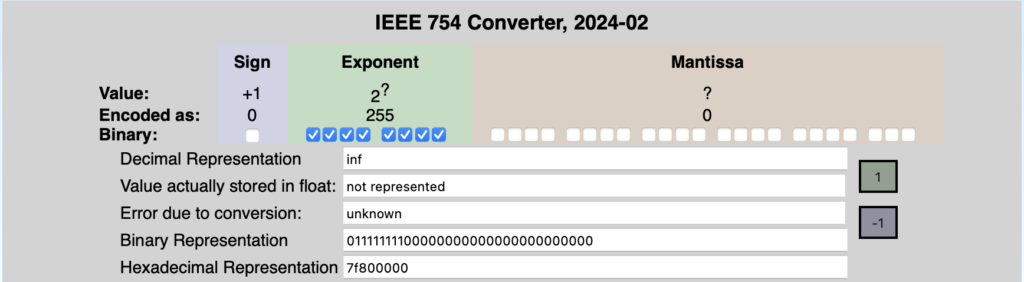
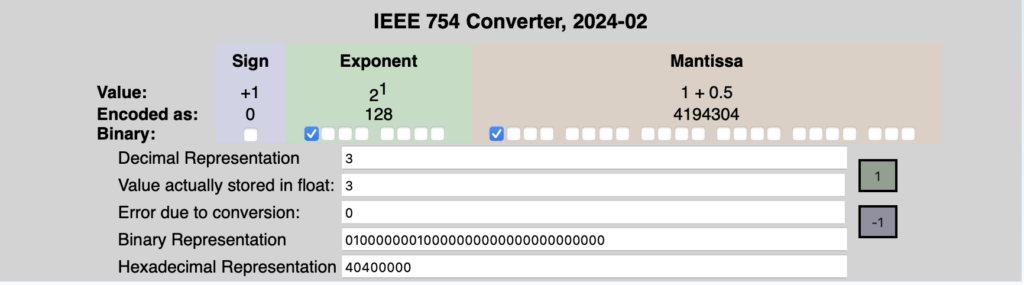
This way of thinking about numbers is definitely not trivial and unintuitive for human. As always, practicing is the best way to get an intuition, fortunately, some amazing people built some tool to help us see and manipulate IEEE 754 numbers. Here’s one I used a lot to help me visualize what numbers I was manipulating and helped me check the results I got from my program. You can enter en decimal number and it will show you which bit are set, you can also set bit yourself, and see which decimal numbers these represent.
For example, let’s express the number 3. First, you can’t express the number 3 with powers of 2, so you’ll get to the closest power-of-two number, 2 in this case, with 21; then set the mantissa at 0.5, with 2-1 (as 1 is then added to it) which give 21 * 1.5 = 3. To get 5, you’ll set exponent at 4 (22) and the mantissa at 0.25 (2-2), etc.. To make them negative, just set the sign bit to 1.
Where do we go from there ?
That was a very long introduction, what’s next ? What can we do with this ? A lot I guess, but one point in particular struck me. The only difference between positive and negative numbers is the sign bit. All the bits are the same for -5 and 5 apart from this left side bit. Something pretty obvious is deduced from there. When I store an image, there’s as much place available for positive number than negative. But what are negative number when you’re working with pictures ? Yes, there are some cases, actually pretty common cases, where in the darks, pixels can have negative values, especially with Arri footages. But usually we only work with positive numbers. So is there a way to drop this huge space dedicated to negative numbers (actually half of the range of our data) and give it to expand our positive range, getting more precision in our pixel encoding. This is even more useful when writing in 16 bit exr, as 32 bit are so heavy on disk, we could reduce our data loss by a factor of 2, or in other words, keep twice as much data of our pictures !
Spoiler alert : yes we can ! Yes, it works ! But is ‘it really useful ? Meh.. I let you decide. The tool is open source, so try it yourself and see if you want to implement it on your pipeline. Keeping twice as much data that standard half-float encoding seams impressive, but put in perspective of the actual loss from 32 bit to 16 bit, effectively 216 ! Reducing by 2 is.. well, better than nothing. But as we say, the journey, not the destination. You have my opinion on the destination, but the journey is a real exciting, nerdy adventure. Let’s dive into the internals of our pixels !
Digging into our pixel’s source code
The first thing I searched is a way to know how the conversion from 32 to 16 bit is made. Fortunately, the amazingly smart people who made this function gave the source code to the world. I first started to search in the OpenEXR’s source, but it turns out a specific library has been developed for these kind of math problems, called Imath. Also maintained by the Academy Software Foundation (ASWF), this is where we can find the half.h header, where the magic happens.
Two functions are interesting to us in this case, imath_half_to_float and imath_float_to_half. Our goal is now to modify the float_to_half function to replace the sign bit by a more « interesting » data. The half_to_float one is also very important and we will have to implement it in our program/node/plugin because Nuke is only working in 32 bit, and it’s only expecting 32 bit data, so once the conversion is made we will have to convert it back to 32 bit, and Nuke will convert it in 16 bit when writing our exr file. The written file will look totally weird when seen directly as while being 16 bit, the data won’t make sense as it’ll be rearranged by us, so it’ll need to be converted back from our custom 16 bit to standard 16bit or 32 bit. We won’t change the half_to_float function as every half-float value does exist in float, so our rearranged version will live in the 32 bit world without being truncated during the conversion.
Let’s examine the imath_float_to_half function, understand how it works, then see what we can do to change the sign bit with another one.
- Checks whether our value is above 0x38800000 which effectively checks if, once converted to 16 bit, our exponent will be above the denormalize threshold. In half precision the exponent is a 5 bit value which gives 32 possibles values, the bias is 15, so the exponent values once made the power of 2 can go from 215 (216 representing infinity or NaN) and 2-14 (2-15 being the value where our number is denormalized). In summary, is our 16 bit exponent 2-15 or not ? If it does, we jump to the denormalization part of our function.
- If our exponent is above -15, it checks if it will be converted to a value above or equal to 0x7f800000, which will lead to infinity or NaN.
- If not, and that’s the part that mainly interests us, the number will be rounded to the nearest 16bit number, effectively truncating the mantissa.
First 0x38000000 is subtracted, which basically convert our 32 bit exponent to a 16bit exponent (lets say exponent’s bit are numbered from left to right, from 0 to 7, then bits 1,2,3 are removed). Then the mantissa is truncated from 23 bit to 10 bit, and rounded to the closest even number.
32 bit representation of the number 1.7603194, the red bits will be kept in 16 bit conversion:
0 01111111 11000010 101001 000100101

Half positive transformation keeps 1 more bit, thus doubling the precision
0 01111111 11000010 101001 000100101

The encoded 16 bit data will be :
1 01111 11000010 10
Implementing the half positive transformation
This process can theoretically be made with any programming language as long as you can manipulate this kind of data. I started doing it as a C++ plugin for Nuke, but the heaviness of maintaining the code and compiling for every versions pushed me to do it in a Blinkscript node, which makes it much easier to maintain, fast enough to be usable, and close to C++ in its syntax. The catch with blink script is we’re quite limited with the built-in functions. A lot has to be reimplemented by hand to reproduce the actual Imath functions.

First we need to be able to do some type recast, as the blink/c++ compiler won’t let us play with float’s bits directly. Type recast in blink script can be made the same way it’d be done in C.
LET THERE BE POINTERS !
unsigned int uint32_recast (float pixel)
{
  return *(unsigned int *) &pixel;
}

float float_recast (unsigned int pixel)
{
  return *(float *) &pixel;
}
Then we create a variant of the float_to_half function called floatToLargeHalf which is the core function than will place then 11th bit in the place of the sign bit. Instead of shifting the mantissa by 13 bit, we shift by 12 to keep one more bit, which will then be placed in the very left. Note that at every return line of the function, we left-shift by one the ret value, as it will be right shifted in the next step. This will obviously delete the sign bit every time, but in our case it is on purpose.
uVal = ((uVal + 0x000007ff + ((uVal >> 12) & 1)) >> 12);
return (ret << 1) |  uVal;
We then have a toPositiveHalf function that will call floatToLargeHalf and then place mantissa’s 11th bit in the place of the sign bit. In this example, halfToFloat is the exact implementation of imath_half_to_float in blink script.
float toPositiveHalf(float pixel)
{
  unsigned int value = floatToLargeHalf(pixel);
  char addedBit = value & 1;
  value >>= 1;
  value |= (addedBit<<15);
  return halfToFloat(value);
}
Lastly, we create fromPositiveHalf, which will invert our encoding to get back our image with added precision.
float fromPositiveHalf(float pixel)
{
  unsigned int uValue = uint32_recast(pixel);
  uValue |= ((uValue >> 31)&1) << 12;
  uValue &= 0x7FFFFFFF;
  return float_recast(uValue);
}
All of these plus the whole needed blink script kernel functions, to apply this algorithm to every RGB channel of our pixel, are then packed into a file that you can get on my GitHub. You just have to paste it in a Blinkscript node, hit Recompile and voilà ! The only parameter that needs to be set is the Inverse Direction, which is quite self-explanatory.
Conclusion
Shout out to my colleagues at MPC Paris, who listened and watched patiently my demonstration and explanation of this concept. And thank you if you’ve made it to the end of this article, I’m pretty I wouldn’t have if I were you..
Now what happens if we are in the case where we do have negative pixels in our image, like the Arri’s case ? With this technic, we can’t do much, our algorithm can’t distinguish between original negatives and negatives generated by the half positive transform. This would need another channel where we’d put the information saying if the pixel was negative or not. This could be the alpha channel, or any channel created on purpose, but this would imply to put more data in our file.
Actually, if we do accept to have a slightly heavier file than traditional 16 bit, we can use this new channel not only to store the original sign of the channel we’re working on, this would only take 1 bit per channel hence 3bits. Maybe we could make use of the full 16 more bits than we have. It turns out, I already have done it, but this article is already way too long, so I’ll make a part 2, maybe even a part 3. To be honest, I’m not sure why I did that, and I’m neither sure of where this is going. I guess I’m just building my own bird feeder